Wednesday, September 18, 2019

Understanding Rubycritic Smells

Rubycritic is gem that wraps around static analysis gems such as Reek, Flay and Flog to provide a quality report of your Ruby code.

Because this gem was uses as Audit guidelines code quality in my company, I often faced hard time to adjust, optimizing and refactor my code.

I began to summarize Rubycritic detecting behavior and implement it in my code to avoid Smells and easier get at least Grade C to bare pass.

A few my conclusion things to consider when developing code according Rubycritic :


  1. Don't! Never! Avoid! Duplicity Code. Rubycritic love this think and will give you sudden great high score, enough to drop your Code Rating Grade.
  2. Evade complicated nested logic with multiple if, switch, etc. It's saver to use functions to handle logic rather than nested logic. Fox example

    // Rather than this
     if obj == "a"
       if obj1 == "1" && obj2 == "2"
         // Process
       elsif obj1 == "3" && obj2 == "4"
         // Process
       else
         // Process
       end
     elsif obj1 == "b"
       if obj1 == "1" && obj2 == "2"
         // Process
       elsif obj1 == "3" && obj2 == "4"
         // Process
       else
         // Process
       end
     else
      // Process
     end
    
    // Use this
     if obj == "a"
       process(obj1,obj2)
     elsif obj1 == "b"
       process(obj1,obj2)
     else
      // Process
     end
    
    
  3. Evade complicated nested loops with multiple each, for, etc. It's saver to use functions to handle loops rather than nested loops. Fox example

    // Rather than this
     data_sources.each do |data_source|
      data_source.each do |data|
      end
     end
    
    // Use This
     data_sources.each do |data_source|
      process(data_source)
     end
    
    
  4. If your function using nested hash, redeclare multiple used nested hash using variable.

    // rather than
    if params[:id] == '1'
      user = User.where('id = ?',params[:id])
    end
    
    // Used This
    id = params[:id]
    if id == '1'
      user = User.where('id = ?',id)
    end
    

  5.  To combine Hash uses:  .merge!()

          params_data_assign = {}
          params_data_assign[:password_salt] = BCrypt::Engine.generate_salt
          params_data_assign[:password_hash] = BCrypt::Engine.hash_secret(password, self.password_salt)
          params_data.merge!(params_data_assign)


  6. Use method = const_get(method) to change string into Model Constant. (surprisingly isn't it?).

      def myfunction
       my_return = obj == 'User' ? 'User' : 'Member'
       process_my_return(my_return)
      end 
      def process_my_return(my_return)
        method = const_get(my_return)
        data = method.where('id = ?',1)
        // Process
      end
If you have found something more than this or have more effective way. Please, tell us so we can share about this problem more.

Share:

Thursday, September 12, 2019

Using Zend ACL for Dynamic Access Control Privileges from Specifics Database

Zend ACL is flexible access control list implementation for  privileges management. Zend ACL has 3 different area Resources, Role, and Rights.

  • Resources : Object which access is controlled.
  • Role: Object which can request access to resources.
  • Right:  Access Role for access resources.
As a default, Zend ACL give deny value to all resources, we have to built white list access roles for each of resources.
In this example, I will use "user_role" table as Resources, "role_access" table as Rights. 

Share:

Sunday, July 21, 2019

Build Test Plan in Jmeter Apache 2.11

To build Test Plan in Jmeter Apache. We need several step to configuring the process.
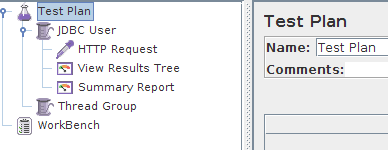
  1. Right click in Test Plan > Add > Thread Group
  2. Customize the Thread Group with your desire configurations like number of threads(User),The Ramp-Up Period, and loop count.
     - Number of threads : Number of   Users
     - The Ramp-Up Period : This property tells JMeter how long to delay between starting each user. For example, if you enter a Ramp-Up Period of 5 seconds, JMeter will finish starting all of your users by the end of the 5 seconds. So, if we have 5 users and a 5 second Ramp-Up Period, then the delay between starting users would be 1 second (5 users / 5 seconds = 1 user per second). If you set the value to 0, then JMeter will immediately start all of your users.
     - Loop Count :
    This property tells JMeter how many times to repeat your test
  3. Right click in Thread Group created before and go to > Add > Config Element > HTTP Request
    • Name -- the name of this HTTP request. The name should be descriptive; remember that it is common to have multiple HTTP Request elements in a thread group.
    • Server Name or IP -- the server name or the IP address of the machine running the application being tested.
    • Port Number -- the port number used by the application. Normally, a Web application runs on port 80.
    • Protocol -- the protocol used, either HTTP or HTTPS.
    • Method -- the request method, either GET or POST.
    • Path -- the path to the resource that will handle this request.
    • Parameters -- the list of parameters sent with this request. Use the Add and Delete buttons to add and remove parameters.
    • Send a file with a request -- simulate a file upload to the Web application.
    • Retrieve all images and Java Applets -- download embedded content.
  4. Right click in Thread Group created before and go to > Add > Listener > View Result Tree.
  5. Right click in Thread Group created before and go to > Add > Listener > Summary Report.
    Explanations:

    Label: Recorded HTTP requests.

    Samples: Samples denote to the number of http request ran for given thread.

    Average:  Average is the average response time for that particular http request. This response time is in millisecond.

    Min: Min denotes to the minimum response time taken by the http request.

    Max: Max denotes to the maximum response time taken by the http request.

    Std.Deviation: This shows how many exceptional cases were found which were deviating from the average value of the receiving time.   The lesser this value more consistent the time pattern is assumed.

    Error %: This denotes the error percentage in samples during run. This error can be of 404(file not found), or may be exception or any kind of error during test run will be shown in Error %. In the above image the error % is zero, because all the requests ran successfully.
Share:

Saturday, July 20, 2019

Install Jmeter

Apache JMeter is a 100% pure Java desktop application designed to load test client/server software (such as a web application ). It may be used to test performance both on static and dynamic resources such as static files, Java Servlets, CGI scripts, Java objects, databases , FTP servers , and more. JMeter can be used to simulate a heavy load on a server, network or object to test its strength or to analyze overall performance under different load types.

Jmeter can do stress test to client/server application such as simultaneously massive user login and process. Jmeter works in protocol level and using Java desktop applications.

 Start Jmeter Installation :
  • Go to terminal and check your Java version by typing "java -version".
    It will give result something like this depending on your Java version.
        java version "1.7.0_60"
       Java(TM) SE Runtime Environment (build 1.7.0_60-b19)
       Java HotSpot(TM) 64-Bit Server VM (build 24.60-b09, mixed mode)
    If nothing displays, please re-Install Java SE runtime environment
  • Download Jmeter from here, and unpack it.
  • Launch Jmeter.
      -
    If you are using Window, just run the file /bin/jmeter.bat to start JMeter in GUI mode as shown below
Share:

Friday, June 21, 2019

Vagrant: Built Customize Vagrant Box

Built Customize Vagrant Box


We can make customize box from our vagrant existed box. With this, we can change our environment in existing box and customize it according our need.


Scripting

// In your Vagrant Init file directory
vagrant up
// Get in to your vagrant environment
vagrant ssh

/*
 * Do your custumize in here
 * For example. I will remove my existing ruby version from vagrant box and change it to new one
 */

sudo apt-get update -y

sudo apt-get install build-essential zlib1g-dev libssl-dev libreadline-dev \
git-core curl libyaml-dev libcurl4-dev libsqlite3-dev apache2-dev -y

curl --remote-name http://ftp.ruby-lang.org/pub/ruby/1.9/ruby-1.9.3-p194.tar.gz

tar zxf ruby-1.9.3-p194.tar.gz

cd ruby-1.9.3-p194/

./configure

make

sudo make install

// Check if my new ruby version successfully installed
ruby -v

// If succeed quit from vagrant ssh
exit

// Adding your customize box to new box
vagrant package

// Name it
vagrant box add lucid64_with_ruby193 package.box

// Check for your new box
vagrant box list

- lucid32
- lucid64
- lucid64_with_ruby193

// Activate your vagrant 
vagrant init lucid64_with_ruby193


Share:

Tuesday, June 18, 2019

Breakman Rails: How to avoid Mass Assignment Warning

Breakman is static analysis security scanner for Ruby on Rails. It's open source vulnerability scanner specifically designed for Ruby on Rails applications. It statically analyzes Rails application code to find security issues at any stage of development.

I will share some trick to avoid Breakman Mass Assignment medium settings warning.
  1. Pay attention to your model relationship. My suggestion always use Nested Attributes .
  2. If necessary used attr_protected to relationship variable key in your model.
Below is some of example case I've solved:
  • Example Case 1 "Without Relationship" :
         Set relationship variable in attr_protected to avoid Breakman warning.
      attr_accessible :name, :description
      attr_protected : user_id
         Do this saving method:
            create :
         data_list = {:name => name, :description => description}
        saving_create = self.new(data_list)
        saving_create.user_id = user_id
        saving_create.save
             update :
        data_list = {:name => name, :description => description}
        user_data = self.find_by_id(1)
        user_data.attributes = data_list 
        user_data.user_id = user_id
        user_data.save

  • Example Case 2 "With Relationship" :
      attr_accessible :name, :description
      attr_protected : user_id

      has_one :category
      has_many :products

      accepted_nested_attributes :category, :products

            create :
        products = []
        data_list = {:name => name, :description => description}
        saving_create = self.new(data_list)
        saving_create.user_id = user_id
        all_data.each do |d|
          saving_process = saving_create.products.build
          saving_process.product_id = d[:product_id] 
          saving_process.product_name = d[:product_name]
        end
        saving_create.save
      update :
        products.each do |p|
        data_list = {:name => p.name, :description => p.description}
         update_process = self.find_by_id(p.user_id)
         update_process.attributes = data_list
         update_process.product_id = p.id
         update_process.product_name = p.id
         unless update_process.save
            raise ActiveRecord::Rollback 

         end
        end
      

Share:

Friday, June 14, 2019

Laravel 4 Scheduller with dispatcher


Dispatcher is a Laravel artisan command scheduling tool used to schedule artisan commands within your project so you don't need to touch your crontab when deploying.

For Futher Information go to this link Dispatcher.


  • Do you hate to touch crontab to add scheduller in laravel?
  • Do you hate with all crontab configuration when add scheduller in different servers?
Congratulations,  Laravel has package to handle this problem using Dispatcher. Everthing become simple and easy with this package. Doubt? Here we go!

Tool Kit

  • PHP 5.3+ or HHVM
  • Laravel 4

Configurations

In your application add this to your "require" :{} composer.json

    "indatus/dispatcher": "1.4.*@dev"

remember to do composer update.
In your app/config/app.php providers array add this line:

'Indatus\Dispatcher\ServiceProvider',

Usage

scheduled
  scheduled:make              Create a new scheduled artisan command
  scheduled:run               Run scheduled commands
  scheduled:summary           View a summary of all scheduled artisan commands

Build scheduled command

php artisan scheduled:make yourCommands

Register scheduled command

In Your app/start/artisan.php add this line depend on Your Command :


Artisan::add(new yourCommands);

Scripting

Go to your command app/command/yourCommands and change 

// my artisan command will be php artisan cron:mycommands
protected $name = 'cron:yourCommands';

// Configure this functions to change schedule time
public function schedule(Schedulable $scheduler)
{
  // Change this function to change time
  return $scheduler->daily();
}

This is Scheduler Changes time function example list:

//every day at 4:17am
return $scheduler->daily()->hours(4)->minutes(17);

//every Monday/Friday at 8:30am
return $scheduler->daysOfTheWeek([
                Scheduler::MONDAY,
                Scheduler::FRIDAY
            ])->hours(8)->minutes(30);

// Using Raw Commands
//every other day at 1:59am, 13:59pm and 23:59pm
return $scheduler->setSchedule(59, [1,13,23], '*/2', '*', '*');

// Every minutes
return $scheduler->everyMinutes();

// Every 20 minutes
return $scheduler->everyMinutes(10);

// Every hours
return $scheduler->everyHours();

Cron Setup

In console add

crontab -e
* * * * * php {{ path to your app}}/artisan scheduled:run 1>> /dev/null 2>&1

Debugging

If your cron not running check this

// Via console, check your mcrypt
php -i | mcrypt.

// Via console
php artisan scheduled:run --debug 
backup:avatars: No schedules were due
     command:name: No schedules were due
     myTestCommand:name: No schedules were due
     cache:clean: /usr/bin/env php /Users/myUser/myApp/artisan cache:clean > /dev/null &
     mail:subscribers: /usr/bin/env php /Users/myUser/myApp/artisan mail:subscribers > /dev/null &

// Via Console
php artisan scheduled:summary
//It works if output something like this:
+----------------+------------------+-----------+--------+------+--------------+-------+-------------+--------+
| Environment(s) | Name             | Args/Opts | Minute | Hour | Day of Month | Month | Day of Week | Run as |
+----------------+------------------+-----------+--------+------+--------------+-------+-------------+--------+
| *              | schedule:test    |           | */5    | *    | *            | *     | *           |        |
+----------------+------------------+-----------+--------+------+--------------+-------+-------------+--------+

Share: