Showing posts with label DevOps. Show all posts

Wednesday, January 8, 2020

Install JDK on Ubuntu 32 bit and 64 bit


To install JDK on Ubuntu we need to do several step. Basically this tutorial for 32-bit and 64-bit Oracle Java 8 JDK on 32-bit and 64-bit Ubuntu operating systems. These instructions will also work on Debian and Linux Mint

1.  Go to terminal and type /sbin/init, this command to check your Ubuntu architecture weather it's 32 or 64 bit.

2. Check Java installed, type java-version on your terminal. If you have OpenJDK installed on your system it will give this results:

  • java version "1.7.0_60"
    OpenJDK Runtime Environment (IcedTea6 1.10pre) (7b15~pre1-0lucid1)
    OpenJDK 64-Bit Server VM (build 19.0-b09, mixed mode) 
Remembered that OpenJDK is not same with JDK.

3. Remove OpenJDK/JRE from your system by running this command: sudo apt-get purge openjdk-\* 

4. Download JDK from Download JDK .Please Remember to download JDK version which fits with your architecture system. For example, if your system running on 32 Bit download 32 Bit Oracle Java binaries.


5.After finished download the JDK file, copy your JDK file to '/usr/local/java'.

   sudo cp -r your-java-binaries /usr/local/java/ 

6.Go to '/usr/local/java/'. cd /usr/local/java/

7. Unpack The Java Binaries in /usr/local/java. Type sudo tar your-java-binaries

8. Your java/ folder will contain jdk and jre directory.


9. Edit system path file.

  • sudo gedit /etc/profile
  • Scroll down until end of file and type:
         JAVA_HOME=/usr/local/java/your-jdk-directory
         PATH=$PATH:$HOME/bin:$JAVA_HOME/bin
         export JAVA_HOME
         export PATH
  • Save and exit
10. Inform your system where your Oracle Java JDK/JRE is located
  • sudo update-alternatives --install "/usr/bin/java" "java" "/usr/local/java/your-jdk-directory/bin/java" 1
  • sudo update-alternatives --install "/usr/bin/javac" "javac" "/usr/local/java/your-jdk-directory/bin/javac" 1
  • sudo update-alternatives --install "/usr/bin/javaws" "javaws" "/usr/local/java/your-jdk-directory/bin/javaws" 1 
 11. Inform your system Oracle Java JDK/JRE must default
  • sudo update-alternatives --set java /usr/local/java/your-jdk-directory/bin/java  
  • sudo update-alternatives --set javac /usr/local/java/your-jdk-directory/bin/javac 
  • sudo update-alternatives --set javaws /usr/local/java/your-jdk-directory/bin/javaws
12. Reload your system wide PATH /etc/profile by typing source /etc/profile
13. Test by run java -version  
  • If your instalation is correct, in terminal will displaying something like this:
          java version "1.8.0_05"
         Java(TM) SE Runtime Environment (build 1.8.0_05-b13)
         Java HotSpot(TM) Server VM (build 24.51-b03, mixed mode) 

 
14. Test your javac by run javac -version
  • You should receive a message which displaying something like this: javac 1.8.0_05 
15.Reboot Your System.
Share:

Friday, December 20, 2019

Instal RVM on Linux Ubuntu 64 Bit


RVM is a command-line tool which allows you to easily install, manage, and work with multiple ruby environments from interpreters to sets of gems. To install Ubuntu in RVM

1. Check Apache and Mysql existed in your machine.
  •  Type http://localhost or http://127.0.0.1 on your browser to check apache running.
  • Check /var/www/ directory.
  • In /var/www/index.html type <?php phpinfo(); ?> , then type http://localhost or http://127.0.0.1 on your browser. If apache installation in your machine already correct, your browser will load PHP informations installed on your machine
2.Run on your terminal:
  • bash -s stable < <(curl -s https://raw.github.com/wayneeseguin/rvm/master/binscripts/rvm-installer)
  • source ~/.bash_profile .Note : This command is for reload opened terminal. 
  • rvm requirements. Note : This command is for searching all libs that still needed, and then install the lib.
 3. Install Ruby according to the version we need:     
  • rvm install 1.9.3
4.Install another version of ruby with this method.
5. To view all installed RVM 
  • rvm list
6.To use specifics RVM 
  • rvm use 1.9.3
 7.If there is an error when running rvm use 1.9.3 try open file ~/.bashrc and ~/.bash_profile and then add this script :

[[ -s "$HOME/.rvm/scripts/rvm" ]] && source "$HOME/.rvm/scripts/rvm" # Load RVM into a shell session

8. To use Specifics Gemset

  • rvm use 1.9.3
  • rvm gemset use rails3.2
  • rvm use 1.9.3@rails3.2
9. Set Default RVM
  • rvm use 1.9.3@rails3.2 --default

Share:

Thursday, November 28, 2019

MongoDB in PHP


The MongoDB PHP driver should work on nearly any system: Windows, Mac OS X, Unix, and Linux; little- and big-endian machines; 32- and 64-bit machines; PHP 5.2, 5.3, 5.4 and 5.5.

Install MongoDB Driver PHP

  • sudo pecl install mongo
  • Add extension=mongo.so in php.ini (/etc/php5/cli/php.ini)
  • Restart Apache: sudo service apache2 restart
Check Installed MongoDB
  • Check is MongoDB extensions already loaded in your PHP php --ini
    already installed: /etc/php5/cli/conf.d/mongo.ini
  • Check is MongoDB extesions already enabled php -i | grep 'Mongo' Already Enabled: MongoDB Support => enabled
  • Type <? phpinfo(); in your PHP applications.
Share:

Monday, November 18, 2019

Install MongoDB on Ubuntu


MonggoDB provides package that supported officially. This package contains:

  • mongodb-org
  • mongodb-org-server
  • mongodb-org-mongos
  • mongodb-org-shell
  • mongodb-org-tools
Install MonggoDB Package.

  • Import Public Key used by Management System.
    Type on Terminal: sudo apt-key adv --keyserver hkp://keyserver.ubuntu.com:80 --recv 7F0CEB10
  • Create List File.
    echo 'deb http://downloads-distro.mongodb.org/repo/ubuntu-upstart dist 10gen' | sudo tee /etc/apt/sources.list.d/mongodb.list
  • Update Package.
    sudo apt-get update
  • Install MongoDB package
    sudo apt-get install -y mongodb-org


Running MongoDB
  • sudo service mongod start
MongoDB Shell
  • type: mongo
Share:

Saturday, November 2, 2019

Install JRE on Ubuntu


Java Runtime Enviroment also known as JRE is part of Java Development Kit JDK a software development environment for writing Java applications. JRE consist Java Virtual Machine, core classes, and supporting files.
Installing JRE on ubuntu is a little bit different with installation JDK. First, Download the JRE file in here. Remember to download JRE version based on your system version either it's 32bit or 64bit.
After finished downloading your JRE version, we can begin the installation process.

  1. Create new folder in opt directory. In terminal type this command "sudo mkdir -p -v /opt/java/64".
  2. Go to folder containing your JRE download file(example: use"cd Downloads" to move to Download directory from your home directory) and unpack the file by typing "tar xvzf YOUR JRE FILE".
  3. Moved unpacked contents into system folder that you created in step1. Type "sudo mv -v YOUR JRE FILE /opt/java/64".
  4. Inform the system and make the new JRE become your system default.
    sudo update-alternatives --install "/usr/bin/java" "java" "/opt/java/64/YOUR EXTRACTED JRE FILE/bin/java" 1
    sudo update-alternatives --set java /opt/java/64/YOUR EXTRACTED JRE FILE/bin/java
  5. Install Firefox plugins. Type "mkdir -v ~/.mozilla/plugins".
  6. Removed IcedTea plugin, if it has been installed. type "sudo apt-get remove icedtea-6-plugin && sudo apt-get remove icedtea-7-plugin".
  7. Remove an older version of the Java plugin. Type "rm -v ~/.mozilla/plugins/libnpjp2.so".
  8. Install the plugin by creating symbolic link. Type "ln -s /opt/java/64/jre1.7.0_60/lib/amd64/libnpjp2.so ~/.mozilla/plugins/".
  9. Close and restart Firefox
  10. Type "about:plugins" in Firefox URL bar. If your installation is correct you will see something like this:

Share:

Sunday, July 21, 2019

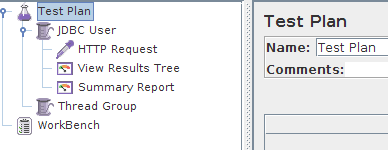
Build Test Plan in Jmeter Apache 2.11

To build Test Plan in Jmeter Apache. We need several step to configuring the process.
  1. Right click in Test Plan > Add > Thread Group
  2. Customize the Thread Group with your desire configurations like number of threads(User),The Ramp-Up Period, and loop count.
     - Number of threads : Number of   Users
     - The Ramp-Up Period : This property tells JMeter how long to delay between starting each user. For example, if you enter a Ramp-Up Period of 5 seconds, JMeter will finish starting all of your users by the end of the 5 seconds. So, if we have 5 users and a 5 second Ramp-Up Period, then the delay between starting users would be 1 second (5 users / 5 seconds = 1 user per second). If you set the value to 0, then JMeter will immediately start all of your users.
     - Loop Count :
    This property tells JMeter how many times to repeat your test
  3. Right click in Thread Group created before and go to > Add > Config Element > HTTP Request
    • Name -- the name of this HTTP request. The name should be descriptive; remember that it is common to have multiple HTTP Request elements in a thread group.
    • Server Name or IP -- the server name or the IP address of the machine running the application being tested.
    • Port Number -- the port number used by the application. Normally, a Web application runs on port 80.
    • Protocol -- the protocol used, either HTTP or HTTPS.
    • Method -- the request method, either GET or POST.
    • Path -- the path to the resource that will handle this request.
    • Parameters -- the list of parameters sent with this request. Use the Add and Delete buttons to add and remove parameters.
    • Send a file with a request -- simulate a file upload to the Web application.
    • Retrieve all images and Java Applets -- download embedded content.
  4. Right click in Thread Group created before and go to > Add > Listener > View Result Tree.
  5. Right click in Thread Group created before and go to > Add > Listener > Summary Report.
    Explanations:

    Label: Recorded HTTP requests.

    Samples: Samples denote to the number of http request ran for given thread.

    Average:  Average is the average response time for that particular http request. This response time is in millisecond.

    Min: Min denotes to the minimum response time taken by the http request.

    Max: Max denotes to the maximum response time taken by the http request.

    Std.Deviation: This shows how many exceptional cases were found which were deviating from the average value of the receiving time.   The lesser this value more consistent the time pattern is assumed.

    Error %: This denotes the error percentage in samples during run. This error can be of 404(file not found), or may be exception or any kind of error during test run will be shown in Error %. In the above image the error % is zero, because all the requests ran successfully.
Share:

Saturday, July 20, 2019

Install Jmeter

Apache JMeter is a 100% pure Java desktop application designed to load test client/server software (such as a web application ). It may be used to test performance both on static and dynamic resources such as static files, Java Servlets, CGI scripts, Java objects, databases , FTP servers , and more. JMeter can be used to simulate a heavy load on a server, network or object to test its strength or to analyze overall performance under different load types.

Jmeter can do stress test to client/server application such as simultaneously massive user login and process. Jmeter works in protocol level and using Java desktop applications.

 Start Jmeter Installation :
  • Go to terminal and check your Java version by typing "java -version".
    It will give result something like this depending on your Java version.
        java version "1.7.0_60"
       Java(TM) SE Runtime Environment (build 1.7.0_60-b19)
       Java HotSpot(TM) 64-Bit Server VM (build 24.60-b09, mixed mode)
    If nothing displays, please re-Install Java SE runtime environment
  • Download Jmeter from here, and unpack it.
  • Launch Jmeter.
      -
    If you are using Window, just run the file /bin/jmeter.bat to start JMeter in GUI mode as shown below
Share:

Friday, June 21, 2019

Vagrant: Built Customize Vagrant Box

Built Customize Vagrant Box


We can make customize box from our vagrant existed box. With this, we can change our environment in existing box and customize it according our need.


Scripting

// In your Vagrant Init file directory
vagrant up
// Get in to your vagrant environment
vagrant ssh

/*
 * Do your custumize in here
 * For example. I will remove my existing ruby version from vagrant box and change it to new one
 */

sudo apt-get update -y

sudo apt-get install build-essential zlib1g-dev libssl-dev libreadline-dev \
git-core curl libyaml-dev libcurl4-dev libsqlite3-dev apache2-dev -y

curl --remote-name http://ftp.ruby-lang.org/pub/ruby/1.9/ruby-1.9.3-p194.tar.gz

tar zxf ruby-1.9.3-p194.tar.gz

cd ruby-1.9.3-p194/

./configure

make

sudo make install

// Check if my new ruby version successfully installed
ruby -v

// If succeed quit from vagrant ssh
exit

// Adding your customize box to new box
vagrant package

// Name it
vagrant box add lucid64_with_ruby193 package.box

// Check for your new box
vagrant box list

- lucid32
- lucid64
- lucid64_with_ruby193

// Activate your vagrant 
vagrant init lucid64_with_ruby193


Share:

Sunday, April 21, 2019

Setting Vagrant with VHOST


1. Install Vagrant in this article.

2. Log to your Vagrant from directory projects with Vagrantfile.
  •  vagrant ssh
3. From your Vagrant server type: 
  • sudo nano /etc/apache2/apache2.conf
4. Add this text in apache2.conf

<Directory /home/vagrant/public_html/>
        Options Indexes FollowSymLinks
        AllowOverride All
        Require all granted
</Directory>

Directory /home/vagrant/public_html/ : I put my vagrant directory sync in this path. If you use /var/www/ you can skip this step.

5. From your Vagrant server go to: 
  • cd /etc/apache2/sites-available/
6. Create vhost file for example: sample.conf

7. In sample.conf create this configuration:

<VirtualHost *:80>
        ServerName sample.notcom

        ServerAdmin webmaster@localhost
        DocumentRoot /home/vagrant/public_html/php/sample

        ErrorLog ${APACHE_LOG_DIR}/error-sample.log
        CustomLog ${APACHE_LOG_DIR}/access-sample.log combined
</VirtualHost>

ServerName: Use this to access app from browser.
DocumentRoot: path to your sync projects registered in Vagrantfile
ErrorLog and CustomLog: Log Apache2

8. Register sample.conf to sites-enabled
  • sudo a2ensite sample.conf

9. Restart your apache
  • sudo service apache2 restart
10. Access your app using:
  • sample.notcom
  • IP registered in Vagrantfile. config.vm.network "private_network", ip: "192.168.33.10"
  • If, it's still not works use registered PORT in Vagrantfile: 192.168.33.10:8064
11. Remember that you need to install some PHP extensions, PHPMYADMIN, composer, etc in your Vagrant server environment.
Share:

Friday, January 4, 2019

Solving "this exceeds GitHub's file size limit of 100 MB"


When You accidentally push large file to Github this warning will shown :

"this exceeds GitHub's file size limit of 100 MB"

To solve this problem is simple. Just type this command:

git filter-branch -f --index-filter 'git rm --cached --ignore-unmatch YOUR-FILE'

This command will filter chosen file from push process
Share:

Wednesday, November 28, 2018

File Compress,Gunzip,Mysql Command in Terminal Ubuntu

Compress and extract command in Ubuntu.
  • Compress File to Tar:  
tar czf name_of_archive_file.tar.gz name_of_directory_to_tar
  • Extract File from Tar: 
tar -xzvf file.tar.gz
  • Extract gz to MYSQL: 
gunzip < file-name.sql.gz | mysql -u user -p password  database-name
  • Compress MYSQL to gz: 
mysqldump -u user -p password database-name |gzip -9 > file-name.sql.gz 
  • Export
mysqldump -u user  -p password database-name > file-name.sql
  • Import: 
mysql -user -password database-name < file-name.sql
Share:

Sunday, July 8, 2018

Vagrant Rails Puppet. Organizing Manifests with Modules

Built Puppet Manifests using modules allow us to organize our manifests into logical pieces, much as we do with modules in Ruby or packages in Java. We’ve already gotten started on a module structure for our Apache-related Puppet configuration by creating a modules/apache2/files directory holding our customized apache2.conf


Configurations

in your puppet folder create this filer manifests/site.pp

apply your puppet and check it's working: sudo puppet apply --verbose manifests/site.pp

 Exec {
  path => "/usr/local/sbin:/usr/local/bin:/usr/sbin:/usr/bin:/sbin:/bin"
 }
 include apache2


create your virtual host in here: modules/apache2/files/massiveapp.conf


  ServerName myapp
  DocumentRoot "/var/myapp/current/public/"
  CustomLog /var/log/apache2/myapp-access_log combined
  ErrorLog /var/log/apache2/myapp-error_log

In your puppet folder built this directory files: modules/apache2/manifests/init.pp
in init.pp create this config:

package {
  "apache2":
  ensure => present,
  before => File["/etc/apache2/apache2.conf"]
}

service {
  "apache2":
  ensure => true,
  enable => true,
  subscribe => File["/etc/apache2/apache2.conf"]
}

file {
"/etc/apache2/apache2.conf":
  owner => root,
  group => root,
  mode => 644,
  source => "puppet:///modules/apache2/apache2.conf";

"/etc/apache2/sites-enabled/massiveapp.conf":
  source => "puppet:///modules/apache2/massiveapp.conf",
  owner => root,
  group => root,
  notify => Service["apache2"],
  require => Package["apache2"];
}

file {
"/etc/apache2/apache2.conf":
  owner => root,
  group => root,
  mode => 644,
  source => "puppet:///modules/apache2/apache2.conf";
"/etc/apache2/sites-enabled/massiveapp.conf":
  source => "puppet:///modules/apache2/massiveapp.conf",
  owner => root,
  group => root,
  notify => Service["apache2"],
  require => Package["apache2"];
}


Share:

Wednesday, July 23, 2014

Record Scenario With Jmeter

Many of Us has difficulties to Record Scenario with Jmeter. Most problems appears in configurations and browser connection. I will try to explain step by step to setup Jmeter for recording scenario.


  1.  Right Click in Test Plan > Add > Thread Groups.
  2.  Right Click in Thread Groups > Add > HTTP Request Defaults. And filled your Server name or IP to be recorded by Jmeter.

  3. Right Click in Workbench > Non Test Elements > HTTP Proxy Servers. And fill available port, I used 8080.

  4. Drag HTTP Proxy Servers to below HTTP Request Defaults. Use "Insert Before" options. It should become like this:

  5. Right Click in Thread Groups > Logic Controller > Recording Controller.
  6. Right Click in Thread Groups > Listener > View Result Tree
  7. Right Click in Thread Groups > Listener > View Result in Table
  8. Go to File > Save As Test Plan. Save it.
  9. Open your FireFox browser. Go to Edit > Preferences > Advanced > Network > Settings

  10. Clik OK. And Open Jmeter.
  11. Go to HTTP Proxy Servers and click Start.
  12. Go to Your Browser, Type URL, and do the scenario.
  13. In Recording Controller it will appear some result, Expand it for further details.


            (Example)
  14. To watch Generation Time and more advanced recording, In your Jmeter go to Run start and open View Result Tree, it will collected all data in previous scenarios.
Share: